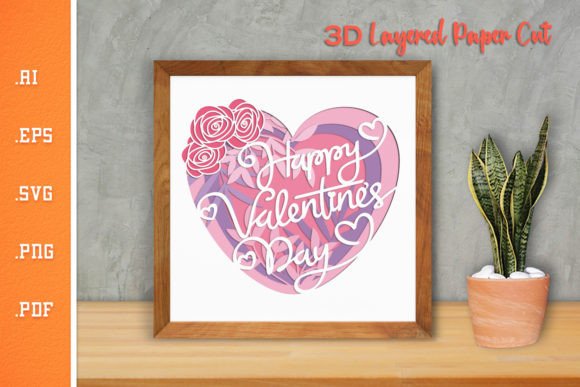
3D Message Heart Cut File: A Comprehensive Guide to Digital Crafting Success
In the world of modern crafting, the ability to translate digital designs into tangible, three-dimensional art has never been more accessible. For hobbyists and professionals alike, the 3D Message Heart Cut File represents a versatile tool that bridges the gap between simple paper crafts and complex structural engineering. Whether you are looking to create heartfelt gifts for Valentine’s Day, anniversary surprises, or unique home decor pieces, understanding how to utilize this specific digital asset is key to achieving professional results.
This article explores what the 3D Message Heart Cut File entails, the challenges creators often face when working with layered designs, and practical solutions to ensure your project turns out exactly as envisioned. By focusing on preparation, material selection, and machine compatibility, you can transform a simple zip file into a stunning physical object.
Understanding the Digital Asset
Before diving into the cutting process, it is crucial to understand what you are purchasing. The 3D Message Heart Cut File is not a physical product; it is a digital download designed for precision cutting machines. Created using Adobe Illustrator, the design is optimized for accuracy, ensuring that every line and curve aligns perfectly when printed or cut.
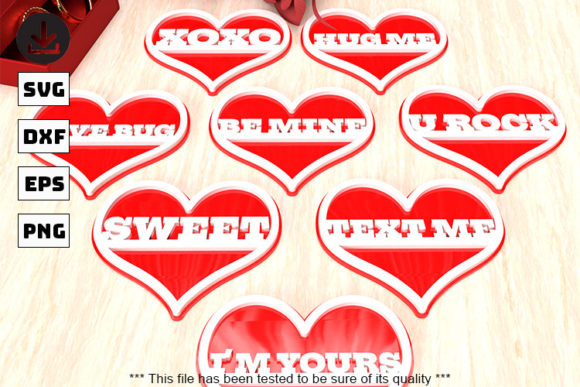
The package typically includes a comprehensive set of file formats to accommodate different software preferences and hardware capabilities. These formats usually include:
- SVG (Scalable Vector Graphics): Ideal for Cricut and Silhouette users, allowing for easy resizing without loss of quality.
- EPS and DXF: Essential for vector-based editing in programs like CorelDRAW or Inkscape, and compatible with many laser cutters.
- PNG (Transparent): Useful for printing templates or visualizing the design before cutting.
- PDF: Provides a reliable way to view the layout and dimensions on any device.
Because the design is made on a 30cm x 30cm page, it offers a substantial footprint for detailed work. However, the complexity of a "3D" design means that it relies heavily on the user’s ability to assemble layers correctly. This is where proper preparation becomes the most critical step in the workflow.
Common Challenges in Layered Cutting Projects
While the concept of a layered heart seems straightforward, executing it successfully requires attention to detail. Many users encounter issues such as misaligned layers, fragile connections breaking during removal, or designs that do not fit their specific cutting mat size. Additionally, the choice of material plays a significant role in the final outcome. Soft materials like standard cardstock may behave differently than rigid materials like wood or metal, leading to frustration if expectations are not managed correctly.
Another common hurdle is software interpretation. Different cutting machines interpret vector paths differently. For instance, a design that looks perfect on screen might require manual adjustments in the cutting software to ensure that internal details do not fall out prematurely. Understanding these nuances is vital for anyone seeking to produce high-quality results with their 3D Message Heart Cut File.
Material Selection and Machine Compatibility
The beauty of this digital file lies in its versatility. It is engineered to work with a wide array of materials and machines, including CNC routers, laser cutters, and electronic cutting plotters like Cricut or Silhouette. However, success depends on matching the right material to the right machine.
For Laser and CNC Users
If you own a laser cutter, you have access to a broad spectrum of materials. Wood, acrylic, plywood, and even thin metals can be used to create durable, long-lasting versions of the heart design. When working with thick materials, the precision of the laser allows for clean edges and intricate details that would be impossible to achieve with a blade. Ensure that your machine’s bed size accommodates the 30cm x 30cm design, or plan to split the file into sections if necessary.
For Electronic Cutter Users (Cricut/Silhouette)
Users without laser equipment can still achieve excellent results by adjusting their approach. The recommendation for Cricut users is to use heavy chipboard or balsa wood (approximately 2mm thick). Because electronic blades have limited depth penetration compared to lasers, doubling up layers of heavy chipboard can provide the necessary stability and thickness to mimic the look of solid wood.
A critical tip for Cricut users involves the use of the "Weld" button in the software. Since the design consists of multiple overlapping shapes to create a 3D effect, individual elements may need to be welded together before sending the job to the machine. This prevents the software from treating connected parts as separate entities, which could lead to misalignment or unnecessary cuts. Always preview your design in the cutting software to verify that all welds are secure and no stray lines remain.
Step-by-Step Implementation Guide
To ensure a smooth experience from download to finished product, follow these practical steps:
- Download and Extract: Once purchased, you will receive a zip file. Right-click the folder and select "Extract All" to unpack the contents. Keep the original files intact until you are ready to open them in your preferred software.
- Software Setup: Open the SVG or DXF file in your cutting software. Check the dimensions to ensure they match your desired output size. If you are scaling the design, make sure to maintain the aspect ratio to avoid distortion.
- Material Preparation: Cut your material to size, keeping within the 30cm x 30cm boundary. If using multiple layers for a 3D effect, cut identical copies of each layer stack.
- Cutting Process: Load your material into the machine. Perform a test cut on scrap material first to adjust blade depth and pressure settings. This is especially important when working with thicker materials like chipboard or wood veneer.
- Weeding and Assembly: Carefully remove excess material ("weeding"). For 3D designs, pay close attention to small internal pieces that may need to be held in place temporarily. Assemble the layers according to the design instructions, often using adhesive dots or glue to maintain spacing between layers to enhance the 3D illusion.
Practical Applications and Creative Ideas
The 3D Message Heart Cut File opens up numerous creative possibilities. Here are a few ways to utilize this design:
- Wedding Decor: Create large-scale wall hearts for reception backdrops or table numbers. Using wood or metallic cardstock adds a touch of elegance.
- Personalized Gifts: Engrave names or dates onto wooden hearts using a laser cutter, or write messages by hand on the flat surfaces of chipboard versions.
- Holiday Displays: Stack multiple layers to create dimensional centerpieces for Valentine’s Day or anniversaries. Painting the edges of layered cardboard can add a custom color gradient.
- Business Branding: Small businesses can use sturdy wooden or acrylic versions of this design as logo displays or promotional items, leveraging the heart shape to convey care and community.
Final Considerations for Success
Ultimately, the success of your project with the 3D Message Heart Cut File hinges on patience and precision. Take time to familiarize yourself with the file structure before committing expensive materials. Experiment with different adhesives and assembly techniques to find what works best for your specific setup. Remember that while the digital file provides the blueprint, your craftsmanship brings it to life.
By respecting the technical requirements—such as welding paths in software and selecting appropriate materials—you can overcome common crafting hurdles. Whether you are a seasoned pro with a laser cutter or a beginner with a Cricut, this versatile design offers a rewarding challenge that yields impressive, personalized results. Embrace the learning process, and enjoy the satisfaction of creating something beautiful and meaningful from a simple digital download.