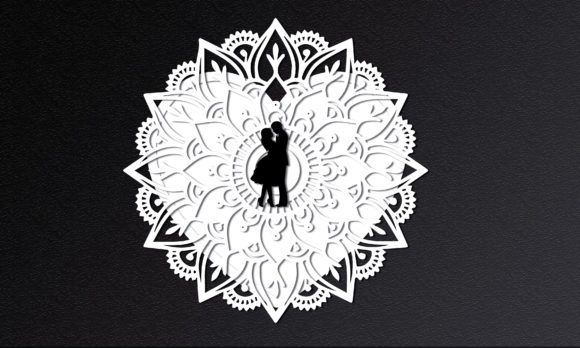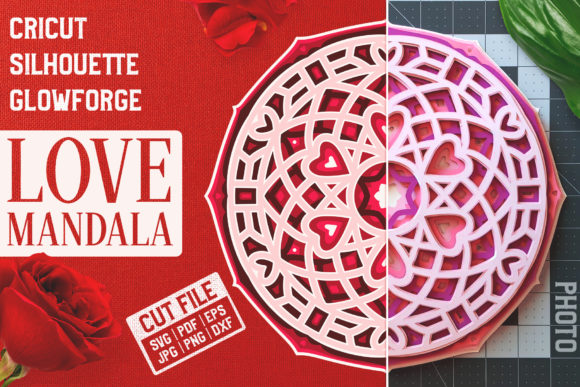
Layered 3D Love Mandala
There is a specific kind of magic that happens when flat digital designs are transformed into tangible, dimensional art. The Layered 3D Love Mandala sits right at that intersection of modern digital crafting and traditional decorative arts. It isn’t just a pattern; it’s an architectural challenge for your hands and your machine. Whether you are holding a Silhouette cutter, programming a Cricut, or setting up a Glowforge laser, this design offers a sophisticated way to celebrate romance, Valentine’s Day, or simply the aesthetic beauty of geometric symmetry.
At its core, this project involves taking a complex mandala design—specifically themed around love and hearts—and breaking it down into six distinct layers. When these layers are stacked, they create a deep, shadow-casting effect that draws the eye inward. The result is a piece of wall art that feels alive, shifting in appearance depending on the angle of the light and the viewer’s perspective. It transforms a simple concept like "hearts" into a high-end, gallery-worthy installation.
Why This Design Works Beyond Valentine’s Day
While the theme is undeniably romantic, limiting the Layered 3D Love Mandala to February would be a missed opportunity. The geometric precision and the organic flow of the heart motifs make it versatile enough for various interior design contexts. Consider a modern loft with exposed brick walls; a large-scale version cut from black acrylic or dark stained plywood adds a striking focal point that feels contemporary rather than kitschy. In contrast, the same design cut from white cardstock with gold foil accents fits perfectly in a boutique wedding venue or an elegant bridal shower setup.
Crafters often find themselves looking for projects that offer a high reward for their effort. This mandala provides exactly that. Because the design includes both vector and raster files, along with two versions (round and square), it adapts to different framing needs. A round mandala works beautifully as a standalone circular frame, while the square version integrates seamlessly into standard rectangular shadow boxes. This flexibility means you aren't locked into one display method, allowing you to experiment with layout and spacing before committing to glue.
The Joy of Material Experimentation
One of the most compelling aspects of this SVG cut file is how dramatically the material choice alters the final emotional impact of the piece. Paper and cardstock are the obvious starting points. They are forgiving, easy to cut, and perfect for gifting. Imagine handing someone a small, intricate mandala made from textured cream cardstock with subtle red watercolor washes between the layers. It’s personal, delicate, and deeply thoughtful.
However, pushing the boundaries yields even more impressive results. Plywood, particularly basswood or birch, introduces warmth and texture. When laser-cut, the edges of wood have a natural charred look that can add rustic charm, especially if left unfinished or lightly sealed with matte varnish. For a sleeker, more industrial look, consider using thin acrylic sheets. Clear or frosted acrylic allows light to pass through, creating a glowing effect if placed near a window or backlit. Metal sheeting, though challenging for some home machines, can produce stunning, durable pieces for outdoor garden art or permanent home installations.
Mastering the Assembly: Depth and Dimension
The true secret to making the Layered 3D Love Mandala pop lies not in the cutting, but in the assembly. The provided guide suggests stacking layers in a specific order, but the real magic comes from the spacers. Using double-sided foam dots, adhesive tabs, or tape between each layer is crucial. Without these spacers, the layers will lie flat against each other, flattening the visual depth and defeating the purpose of the 3D design.
Think of it like building a cake. Each layer needs space to breathe so the structure holds its shape. When assembling, start with the largest, outermost layer and work your way inward. Apply your adhesive spacers to the back of each subsequent layer before placing it on top. Be mindful of alignment; since the design features intricate cutouts, even a millimeter of misalignment can throw off the symmetry. Taking your time here ensures that the shadows cast by the upper layers fall correctly onto the ones below, enhancing the three-dimensional illusion.
Practical Applications for Different Creators
Different users approach crafting with different goals, and this file serves multiple purposes effectively:
- Event Planners: Use the square version as a centerpiece backdrop or a photo booth prop. The depth of the mandala catches camera flashes beautifully, adding professional polish to event decor without the cost of custom fabrication.
- Small Business Owners: If you sell handmade gifts, this mandala offers a premium product tier. By offering choices in materials (e.g., standard paper vs. luxury wood) and sizes, you can cater to different price points. The digital nature of the file means you can produce these on demand, reducing inventory waste.
- Home Decor Enthusiasts: Create a series of smaller mandalas in varying scales and hang them in a gallery wall arrangement. Mixing materials—perhaps one in metal, one in wood, and one in layered paper—creates a dynamic textural contrast that looks curated and intentional.
- Educators and Workshops: This project is excellent for teaching spatial reasoning and precision. The step-by-step layering process helps participants understand how 2D designs translate into 3D objects, making it a great activity for teen craft groups or adult hobby classes.
Considerations Before You Start
While the Layered 3D Love Mandala is user-friendly for those familiar with cutting software, there are practical considerations to keep in mind. First, ensure your machine is calibrated correctly. Intricate details in mandala designs can sometimes tear if the blade pressure is too high or if the material is too thick for the tool being used. Always run a test cut on scrap material to verify settings.
Secondly, consider the weight of your final piece. A multi-layered wooden mandala can become surprisingly heavy. If you plan to hang it, use appropriate hardware such as D-rings or sawtooth hangers rated for the total weight. For lighter versions in paper or cardstock, standard picture hanging strips may suffice, but ensure the backing board is rigid enough to support the stacked layers without bowing.
Finally, think about lighting. As mentioned earlier, this artwork interacts dynamically with light. Positioning the finished mandala where natural light hits it during the day, or where artificial light creates dramatic shadows in the evening, will maximize its visual appeal. Avoid placing it in direct, harsh sunlight if using paper-based materials, as prolonged exposure can cause fading over time.
In summary, the Layered 3D Love Mandala is more than just a craft project; it is a creative exercise in patience, precision, and aesthetic appreciation. By leveraging the included vector and DXF files, you gain the freedom to customize every aspect of the build. Whether you are cutting intricate patterns from delicate paper or burning precise lines into wood, the end result is a testament to the beauty of layered design. It invites you to slow down, appreciate the geometry, and create something that brings warmth and dimension to any space it occupies.